Archives

All posts by tbone

There seem to be a few different models of NMB keyboards, but they mostly boil down to some that are more wedge-shaped but have thinner bezels, and some that are flatter but have a larger bezel. I’ve only ever found one model that was new enough to have Windows keys, and it’s one of the thin ones that takes up a lot of space.

I started by mapping out the pinout of the microcontroller; I think I even found some official documentation at some point. But I ended up with a list of which pins on the 40-pin chip were rows, which were columns, which were capslock/numlock/scrolllock LEDs, and which were power and ground. The rest didn’t really matter.

The NMB keyboards have a matrix with 8 rows and 16 columns. Unfortunately, the bluetooth microcontrollers available didn’t have enough IO pins to connect directly to all of these. My solution was to pick up some IO expander chips (the MCP23017). It’s connected via i2c, so all it needs from the microcontroller is four pins (power, ground, clock, and data). It provides 16 IO pins.

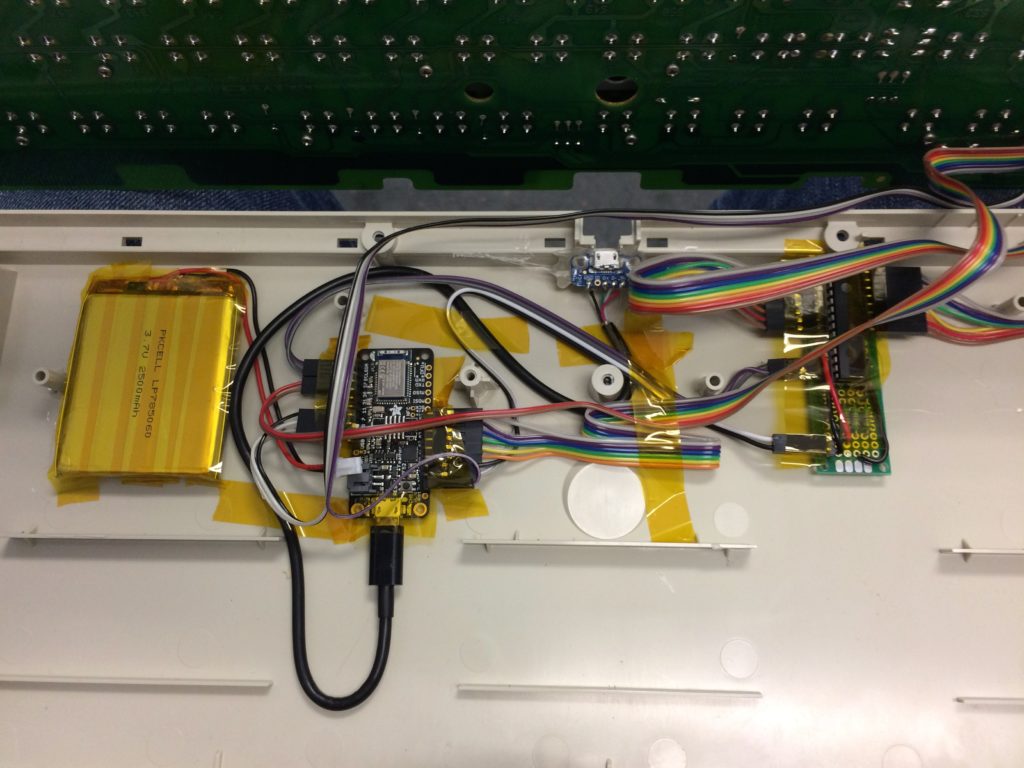
The bluetooth microcontroller I picked was the (then relatively new) NRF52 Feather board from Adafruit. The first version of the board had a bug that prevented it from going into very low power mode (because it was powering the USB->serial chip off of the battery), but it was still a nice board.

For the first version of this, I put one of the expander chips on some prototype board, connected it to the bluetooth microcontroller, and then connected the expander chip to the columns, and the bluetooth board to the rows and LEDs.

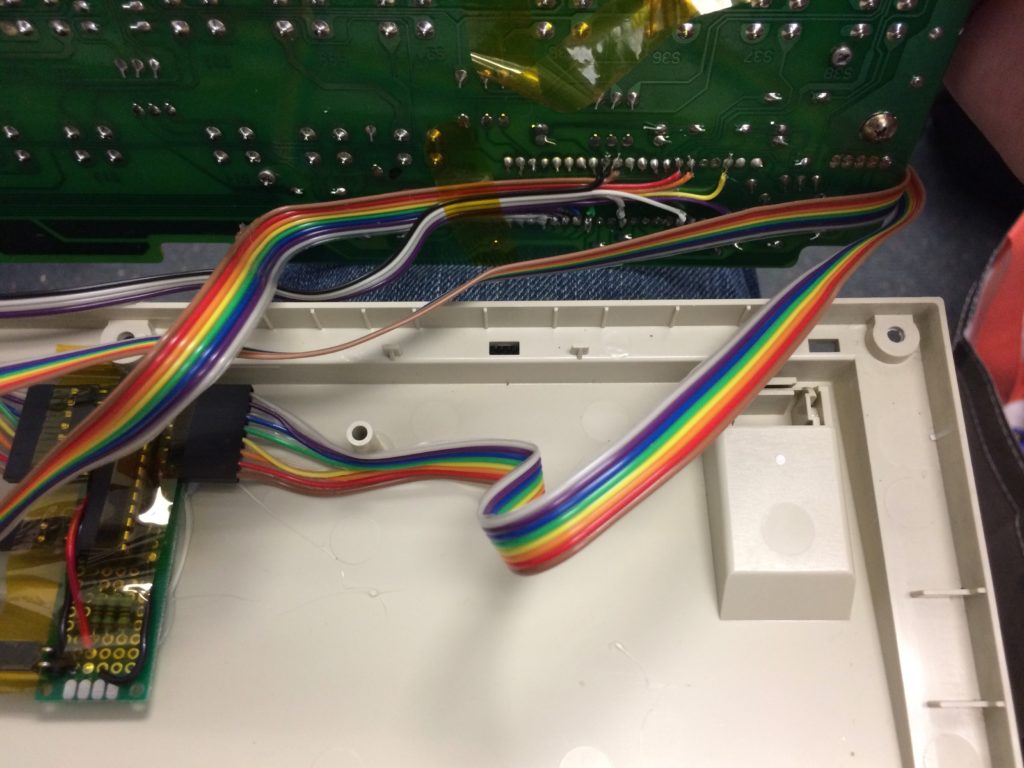
IO Expander on protoboard.
Battery, bluetooth controller, USB connector (charging/programming), and expander board.
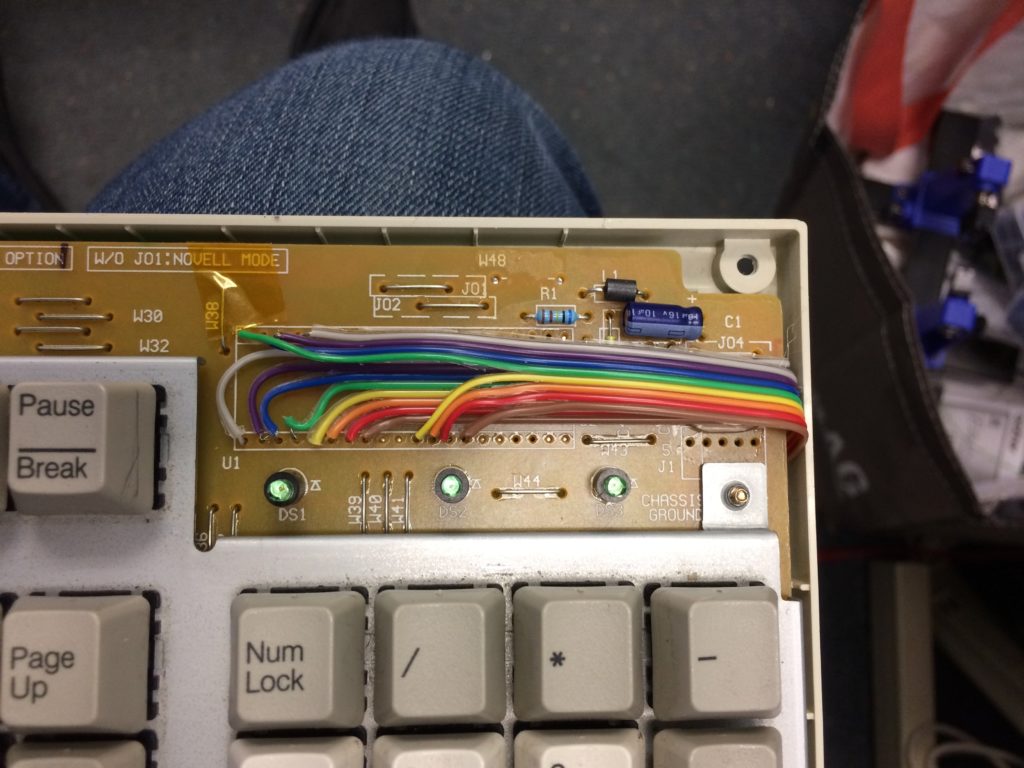
16 wires from the expander lead to the column pins.
The rows and LEDs were connected from the back of the board, leading directly to the bluetooth board.

This worked, but I really wasn’t happy with the mess of wires on both sides of the board. I was determined to follow it up with a version that cleaned up or eliminated a lot of the wiring.

I’m picky about my keyboards. I like them wireless, I like a full layout, and I like good mechanical switches. This is a hard combination to find for sale, as most mechanical keyboards nowadays are marketed towards gamers, and they don’t like the potential latency of wireless keyboards. Even the hobbyist DIY keyboard resources typically revolve around minimalist layouts.

So fine, I’ll make something. This is probably for the best anyway, since my favorite keyswitches are no longer being made. My favorites were the original Apple Extended Keyboard (using undamped ALPS switches), and the lesser-known line of keyboards using the NMB “space invaders” switches. My college roommate had one of those NMB keyboards with his 80286 PC, and I kept that keyboard to this day; a few years ago I hardwired a PS2-to-USB adapter inside it.

I wanted wireless, though, and there were a few different ways of achieving this. The first pass was very hacky. I picked up a cheap $20 logitech wireless keyboard that had a full layout, and mapped out the matrix that its keys used. (Keyboards work by having a grid of rows and columns, and every time you press a key it connects that row and that column. A microcontroller scans across them, looking for connections. The layout of rows/columns to keys varies widely across models, based on PCB layout and other factors.) At this point I could have designed a new PCB for a keyboard that used the same matrix, and attached it to the controller board from the logitech keyboard, but PCB manufacturers charge by the square inch, and these keyboards are large.

Instead, I took my test Apple keyboard, and removed its PCB entirely, and hand-wired connections between keys to match the Logitech matrix. Lest things get too crowded between keys, I used thin magnet wire to connect them. It was not pretty on the back. At this point the only thing holding the keys in was the fact that some (especially early) mechanical keyboards have the keys mounted through a metal plate before being connected to the PCB.

I’m not proud of this, but it worked.

Well, it worked, but the metal plate didn’t provide enough stability; I had to pop a keycap off to fix a flaky keyswitch, and it ended up pulling the whole keyswitch out of the plate, ripping the thin magnet wires out of the back in the process.

If I were to try this approach again, I’d grab a bunch of the enabler boards and connect them with hookup wire or something. But I wasn’t going to try this approach again; for subsequent versions, I wanted to replace the original keyboard’s microcontroller with something that would interface with a modern bluetooth-enabled microcontroller. I had all the information I needed about the Apple keyboard from this site, but those are more expensive for tinkering, so I focused on the NMB models. (Quick note, though: if you like the “clacky” feel of the first Apple Extended Keyboard as opposed to the softened sound and feel of the AEK2, you can take the AEK2, open up each keyswitch, and remove a couple of rubber dampers from each one, and reassemble.)

I’d meant to post about this a while ago, but lost the relevant link until now.

When I was in college, I wrote a tiny DOS Tetris clone called Blocks from Hell. I was an avid player of the game, and there were already many freeware and commercial clones around, but I was frustrated that they generally couldn’t keep up with really fast playing, and many of them seemed like they tried to change up aspects of the game, always to their detriment. My goal in writing my version was to make one that handled championship-level performance, and was as vanilla-standard as possible in its implementation of the game rules.

Well, the problem I ran into was that it wasn’t clear what “standard” meant regarding the rules of the game. I got my hands on every version and variant I could find (in 1989 or so), and they were kind of all over the map in their gameplay. Some things were mostly agreed-upon (like the size of the gameplay area and shapes of the blocks), but things like scoring and level advancement were clearly not. (For example, some of them gave a fixed score per piece played which didn’t reward the player for playing it early, while some of them did crazy things like have a maximum number of points that you could get for playing a piece, but subtracted from that every time the piece was moved or rotated, making it easy for an indecisive player to get no points.) Even things like how the pieces rotated varied among them.

Lacking an authoritative model, I set about trying all of them, and taking notes as to how they handled all of these game aspects. This meant playing random freeware Tetris games while mostly paying attention to the score, to reverse-engineer how some of them worked if they weren’t documented in that much detail. Armed with the information of the dozen-plus versions, I picked the aspects that seemed like the best-fit, or that felt like they made the most sense gameplay-wise. (In the case of the scoring, I went with a small fixed number of points per piece played, plus a bonus based on height from which the piece was dropped immediately down.) I was very pleased with the outcome, and it’s held up well enough that it’s still being played by some enthusiasts, 24 years later.

Well, a few years ago I ran across this article by Colin Fahey, which (along with a great history of the game) attempts to nail down an official set of gameplay rules for “Standard Tetris”, in part so that it could be more usefully used as an artificial intelligence arena. For this, Colin goes to the purest source — the pre-commercial DOS version of Tetris written by Alexey Pajitnov and Vadim Gerasimov in 1986, which I unfortunately never had the chance to test.

It turns out that I could have saved a lot of time if I had seen it, because it tracks almost perfectly with the choices that I used for Blocks from Hell. The scoring differs mostly because the original version didn’t reward the player for clearing lines(!), and the level advancement and speed control are basically identical, except the original starts at the equivalent of level 10 on Blocks.

Overall, I’m very pleased with how close to “pure” Tetris my efforts turned out to be, and I’m seriously impressed at how well-tuned the initial version by Pajitnov and Gerasimov was. Well, except for the lack of a line-clearing bonus. I just can’t get behind that.

While migrating data from my ReiserFS-formatted disks over to ext4 volumes, I ran into a weird issue with a Seagate drive. It’s a Barracuda 7200.14, model ST3000DM001, with the latest firmware. It’s been running fine, and I just copied all of its data off with no problems. Copying new data onto it, though, a short bit into the transfer it slows way down, to below 1MB/s, and eventually drops off of the SATA link entirely. Upon a reboot, it’s all back, and SMART diagnostics show no errors ever detected by the drive. Doing a diagnostic test on the drive shows nothing wrong. Reading the data works fine. I’ve tried the drive in 3 different drive controllers so far, disabled Native Command Queuing (NCQ), replaced cables, no difference. At this point I can just power up the system (which contains multiple drives of the same model that don’t exhibit this problem), and start writing information to that drive without ever reading it, and it starts to slow down within 30 seconds. It drops offline a few minutes later. When I turned off NCQ, it didn’t drop offline during the time I tested it, but it did slow way down, then speed back up, then slow way down again, repeatedly.

It’s not just that this is not how drives are supposed to behave. This isn’t how drives are supposed to fail, either. If there’s a defect on the media, it’s detected when the drive tries to read that section, then reported as a failure and put on a list of sectors pending relocation to a spare area on the disk. The relocation doesn’t happen until that section is overwritten, because the drive then knows that it’s safe to give up on ever reading the old data. None of this explains the behavior of reading being fine, and writing hosing everything without logging a problem on the drive.

I’ve seen 2 or 3 posts online from people clearly describing the exact same problem with this model of drive, but never with a solution; the thread either never went anywhere, or the poster RMA’d the drive. Mine isn’t under warranty according to Seagate’s web page.

At this point, the easy options seem to be exhausted. The next things I can think of to try are:

  • Downgrade the firmware to an older version, if it will let me.
  • Connect a TTL RS232 adapter to the diagnostic port on the drive’s board and see what it says during powerup, and during failure. I haven’t delved into Seagate’s diagnostic commands before, so maybe there’s something there to help.
  • Pull out my new hot air rework station, swap the drive’s BIOS chip with a spare board from a head-crashed drive, and see if that’s any better.

I am vexed by this drive.

As mentioned in the last post, I’ve been using the unRAID linux distribution on my home server for a few years now. I’m a big fan of it, and I heartily recommend it, but my recent experience made me wonder if I’d outgrown it.

Partly this was because of the single-drive redundancy that unRAID is limited to, but it’s also because unRAID is designed to boot off of a flash drive, loading the OS into a RAM disk. This is great for setting up a storage appliance, but the more services you want the machine to run, the clunkier it gets to have everything loaded up and patched into the OS at every boot. Also, unRAID uses only ReiserFS for all of its drives (presumably because it was the only choice at the time for growing a mounted filesystem), which doesn’t have TRIM support for SSDs. Because unRAID’s write performance is sluggish, I was using a cache drive on it, where new files were placed until a nightly cronjob moved them to the protected array. I used an SSD for this, so TRIM support was a big deal.

In the past, some people have documented the process for putting the unRAID-specific components on a full Slackware install (unRAID is based on Slackware), but not as of the latest version. There has also been talk of supporting ext4 (and therefore TRIM) on unRAID’s cache drives, but nothing solid yet.

So, I went looking for potential replacements. The features I was looking for were:

  • Ability to calculate parity across an array of separate filesystems, with the ability to expand the array dynamically. Ideally with multi-drive redundancy.
  • The ability to present a merged view of the filesystems. Historically union filesystems haven’t merged subdirectory contents, so this was potentially tricky.
  • Ideally, it would be a supported platform for Plex Media Server, so I wouldn’t have to go screwing around making it work on a different distribution.

I looked briefly at Arch Linux, which looked like a great learning experience, but the full-manual installation process turned me off. Yes, I know how to do those things, but I’d sure like to not have to do them when I’m in a time crunch to get a replacement server running.

I ended up with CentOS as the base OS; it’s a supported platform for Plex, and I’ve used it on our Asterisk server at work with good experiences.

For the parity calculation, the best bet looked to be SnapRAID. SnapRAID calculates parity across groups of files, not block devices. This means it doesn’t care what the underlying filesystem format is, but it also doesn’t do live parity calculation; it’s updated via a cronjob, so files added since the last update aren’t protected. This didn’t scare me off, since the same thing is true of unRAID when using a cache disk. SnapRAID also supports multiple-drive redundancy, which is a plus.

For the merged filesystem view, I liked aufs. However, it needs support to be compiled into the kernel, so I wasn’t going to be able to use the stock CentOS kernel. I found a packaged aufs-included kernel for CentOS, but it was v3.10 instead of 2.6, which meant that other kernel modules for CentOS wouldn’t work on it. This was problematic, because I would need a kmod to install support for ReiserFS in order to read my existing array disks. I ended up just rebuilding the kernel myself with both features included.

Once that was figured out, the next trick would be to migrate the data disks from ReiserFS to ext4. The plan for this was to set up one new blank ext4 disk, use SnapRAID to fill it with parity from the rest of the (read-only) volumes, and once that was done, reformat the unRAID parity disk as ext4 and start copying data to it. Every time I’d finish cloning a disk’s files, I’d remount the new ext4 volume in that disk’s place, make sure SnapRAID was still happy with everything, and repeat. This worked fine, until I ran into a very strange disk problem, explained later.

(side note: I decided to try actually using my blog for stuff like this; expect more.)

Background: I have a large home media server, previously housed in a Norco 4U rackmount case; in the interests of being able to move it, I rebuilt it a while ago into an NZXT H2 tower case. I was very pleased with the outcome; the machine is reasonably compact, extremely quiet, and housed 14 drives with no problem. All of the SATA cables were purchased as close to the right length as possible, and I custom-made all of the drive power cables to eliminate clutter and maximize airflow.

When it came time to move the whole thing up to Seattle, I had the drives packed separately from the case, but both sets of things were damaged. The case itself is dented by the power supply, but it otherwise fine. One of the drives sounds like it had a head crash, and another one was banged around enough that part of its circuit board was smashed up. Replacing the only visibly smashed component (an SMT inductor) on the board didn’t fix things up.

Other background: I was running unRAID on the server, a commercial distribution of linux designed for home media servers. It uses a modified form of RAID-4, where it has a dedicated drive for parity, but it doesn’t stripe the filesystems on the data drives. This means the write performance is about 25% of a single drive’s throughput, but it can spin drives down that aren’t in use. It also means that, while it has single-drive redundancy like RAID-4 or 5, losing two drives doesn’t mean you lose everything; just (at most) two drives’ worth.

Well, I wasn’t interested in losing two drives worth of stuff. The head-crash drive (3TB Seagate) was clearly a lost cause; at best I’d be able to use it for spare parts for fixing other drives of the same model in the future. The smashed drive, however, had hope. I had another of the same model (Samsung 2TB), and swapping the circuit board between them meant that the smashed drive was about 80% working. (This trick normally requires swapping the drive’s 8-pin BIOS chip, but Samsung drives are more forgiving.)

So, I grabbed whatever spare drives I could, and set about cloning the 80% of the 2TB drive that I could. I used ddrescue for this, which is great — it copies whatever data it can, with whatever retry settings you give it, and keeps a log of what it’s accomplished, so it can resume, or retry later, or retry from a clone (great for optical media). I used it to clone what could be read off of the Samsung drive onto a replacement, and then used its “fill” mode to write “BADSECTOR” over every part of the replacement drive that hadn’t been copied successfully. I then brought up the system in maintenance mode, with the replacement 2TB clone and blank 3TB replacement for the head-crash drive. I had to recreate the array settings (unRAID won’t let you replace two drives at once), but then let the system rebuild the 3TB drive from parity. (Mid-process, one of the other drives threw a few bad sectors. I used ddrescue to copy that disk to /dev/null, and kept the log of the bad sectors. I then used fill-mode to write “BADSECTOR” over the failed sections, forcing them to be reallocated.)

Once the 3TB drive was rebuilt, I then used the ddrescue log files to write “BADSECTOR” on the just-rebuilt drive as well, because areas that were rebuilt off of failed sectors on other drives weren’t to be trusted. (This involved scripting some sector-math, since the partition offset of the drives weren’t the same, and unRAID calculated parity across partitions, not drives.) After that, I fsck’d the 3 drives involved, and then grepped through all files on all of them looking for BADSECTOR, thereby identifying whichever files could no longer be trusted.

This didn’t include files that were just outright missing; I didn’t have a complete list of files, but for the video files at least, I was able to determine what was missing by loading up the sqlite database used by Plex Media Server, which indexed all of those.

In the end, everything was working again, with the lost data reduced down to about 10% of what it would have been. It did get me thinking about changing out the server software, though; but that’s another post.

I am a carbon-based lifeform.  I grew up in Louisiana and Texas; my father was a philosophy professor, my mother a pediatric oncology researcher.  My sister is a flute professor, and my brother owns a small business and does support work for Dell.

When I left home, I attended the Texas Academy of Math and Sciences at the University of North Texas, which meant starting college pretty early.  When I finished that, I moved to Austin, attended UT for a while, started working in the Computer Science department.

By now, I’ve worked there for 20+ years, moving up in responsibility.  I’m currently deeply involved in the planning for transitioning the department’s infrastructure to the new Bill & Melinda Gates Computer Science Complex.

My wife Cynthia is a Ph.D. student in robotics at the University of Washington in Seattle.  There is a lot of travel involved.

I’m big into movies; I built a stadium-seating theater in my house that seats 26 with a 150″ screen.

In my spare time I like to fix things.  Anything, really: electronics, software, cars, plumbing, whatever.  I also like video games, and I have a cat.